Hardwood Desk Top Installation: Cabinet Frame
Installation Guide - Cabinet Frame
**No Glues, Construction Adhisives, Epoxies, or similar should be used at any time when installing hardwood desk tops. Any of these will inhibit hardwood's natural movement and can lead to warping or cracking.
**Every desk top will have a designated top side. This should be apparent just by looking at the desk top. Also, if crated, the desk top will be shipped top side up. If you have any questions about this, don't hesitate to ask.
1. Acclimate Your Hardwood Desk Top:
Upon receipt, bring your desk top into the area where it will be installed. It's important to give the desk top time to acclimate to the conditions in your house. 5 days is adequate for the wood's acclimation process. You can store the desk top on your frame if you’d like. You can also store it against a wall with the planks running vertically if you need to keep it out of the way until installation. Take care in protecting your desk top from damage during this time period. If stored on your desk frame. Make sure you and anyone else in the area are aware that the desk top isn’t screwed in yet and both the desk top and any equipment on the desk top are susceptible to sliding/damage if bumped.
2. Prep Your Cabinet:
One major difference between a real hardwood desk top and one that’s made with a different material (such as laminate, MDF, plywood, or a veneered substrate) is that hardwood expands and contracts with changes in temperature and humidity. You won’t be able to see it expand/contract, but this movement is important to account for when installing your desk top. This is very easy to do and is explained next.
A. If your cabinets have open tops:
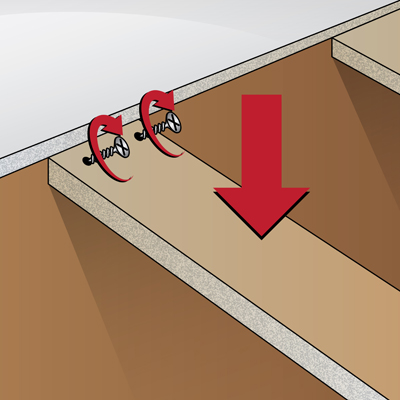
Install blocking if your cabinets have open tops. This is to create a surface that you can attach your hardwood desk top to. Use a quality grade of 3/4" plywood or 1x stock boards to do this. Install the blocking flush with your cabinet tops by first drilling pilot holes at an angle through the blocking and then screwing the blocking to your cabinets. IMPORTANT: Make sure to use properly sized screws so that you don't screw all the way through to the outside of your cabinet.
B. If your cabinets have closed tops:
Install furring strips. Use 1/4" plywood and cut these strips 2" shorter than the cabinet depth. Repeat every 12"-16". You can install these strips with kitchen and bath sealant. This provides a little air space and prevents cupping over time in humid environments or in environments with varied climates.

3. Prep Your Installation Points:
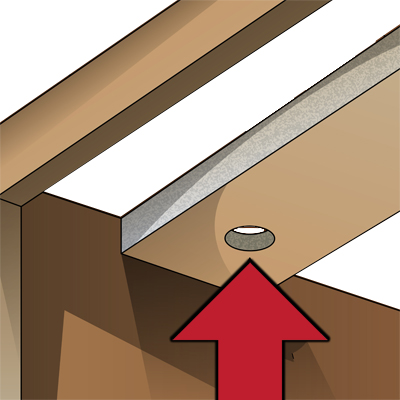
IMPORTANT: Although you won't see it happening, hardwood desk tops will expand and contract based on climate, humidity, and temperature. It is important to follow this step exactly. Do this before you place your desk top on the cabinet. DO NOT apply this step to the desk top itself, only apply this step to the cabinet bracing you've installed in the previous step. Use a 1/2" boring bit to drill holes through your cabinet bracing. Drill these holes at all planned installation points.

4. Position for Installation:
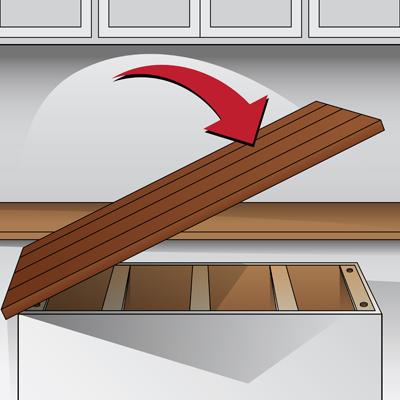
Position your hardwood desk top as it will be installed. From underneath, find the canter of each hole you drilled with the boring bit. Pre-drill into the underside of the hardwood desk top using a drill bit adequately sized for your screws, making sure to mark your depth so as not to drill all the way through your butcher block.

5. Install Your Hardwood Desk Top:
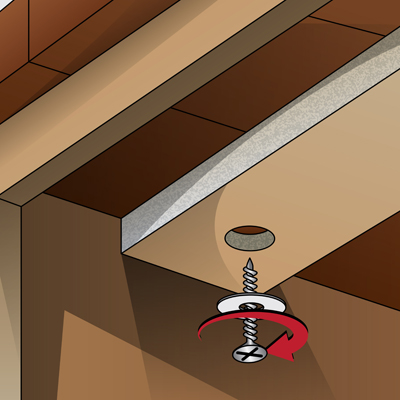
From underneath, fit each of your installation screws with a fender washer. Tighten screws only to the point where they pull the desk top snug with the cabinet. DO NOT OVERTIGHTEN. You should still be able to move the fender washer if you use a little force. If you cannot move the fender washer, your screw is too tight and it needs to be loosened until the point where you can wiggle the fender washer slightly. This process is what allows the hardwood desk top to expand and contract with environmental factors, and is critical to proper installation of your desk top.

6. Congratulations!
Your new Hardwood Desk Top is installed and ready to use. For ongoing Care & Maintenance Instructions, visit http://hardwooddesktops.com/cleaning-and-care-instructions/
